WisExpenseOpen the app
Topics

Spend toward a goal

Link an expense to a goal so it counts against what you planned, and break a goal down into items.

Show steps for

When you spend money you set aside for a goal, link the expense to that goal. The goal then shows what you have spent against what you planned.

Before you start

You need a wallet with a designation for the goal: see Set money aside with designations. Only an expense can be linked to a goal, not an income or a transfer. The goal can be designated on the expense’s wallet or on another wallet you can use.

Web

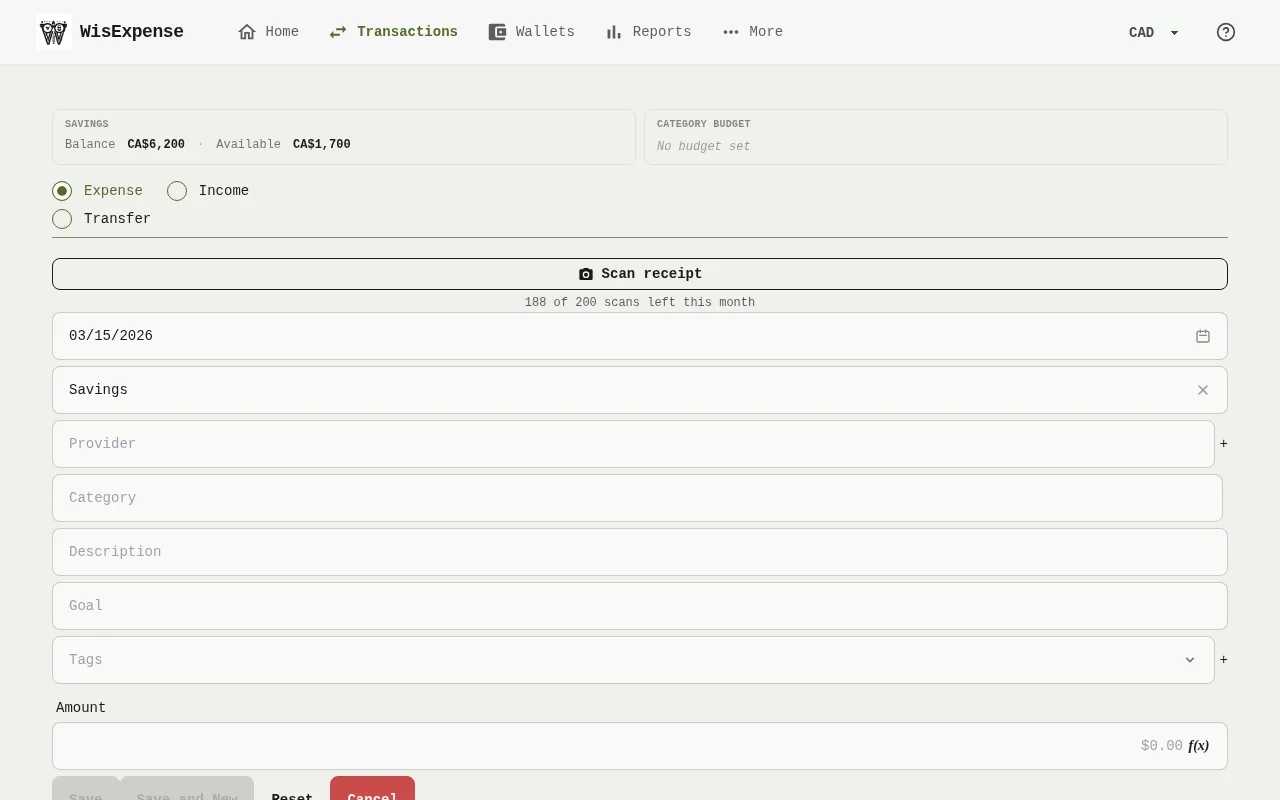
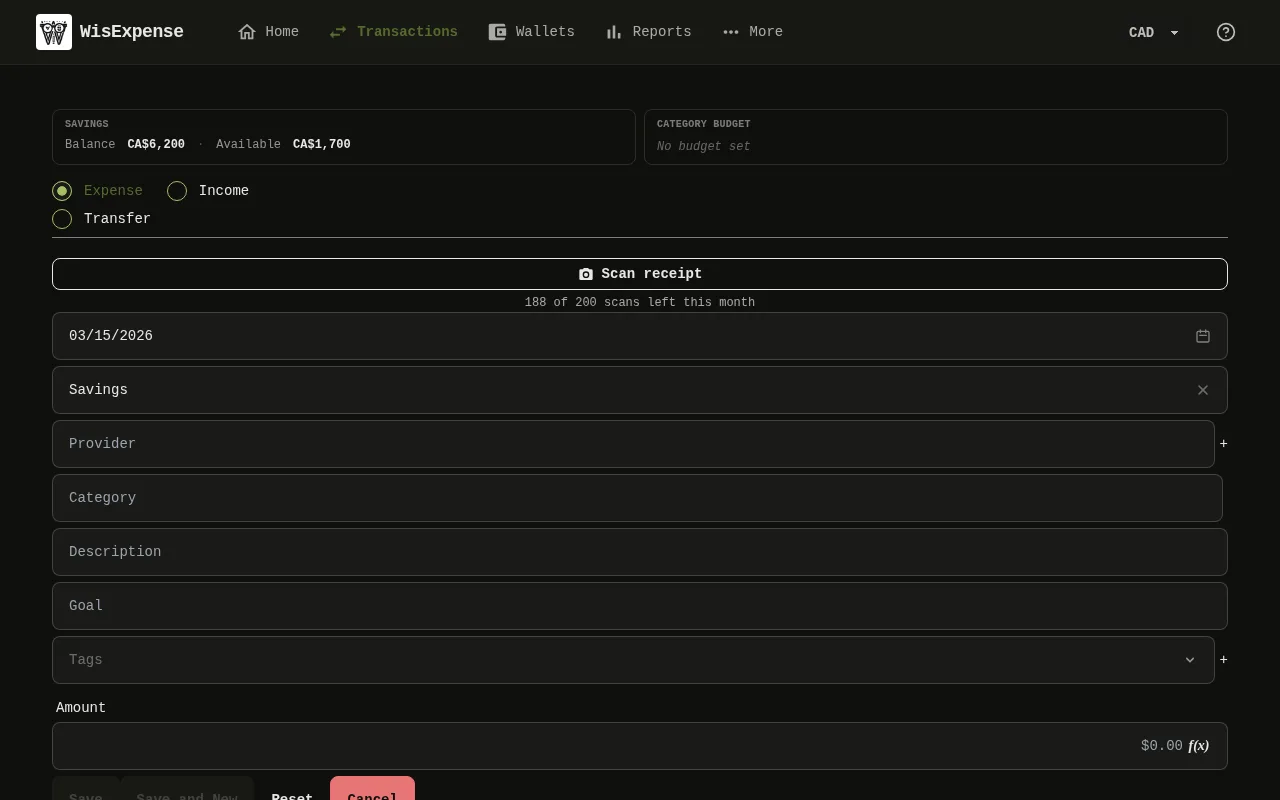
The new transaction form of the web app with the Savings wallet chosen and the Goal field below it. 1: Choose the wallet the expense is recorded in. The Goal field appears when that wallet, or another wallet you can use, has money set aside for an active goal; 2: Choose the wallet the expense is recorded in. The Goal field appears when that wallet, or another wallet you can use, has money set aside for an active goal.The new transaction form of the web app with the Savings wallet chosen and the Goal field below it. 1: Choose the wallet the expense is recorded in. The Goal field appears when that wallet, or another wallet you can use, has money set aside for an active goal; 2: Choose the wallet the expense is recorded in. The Goal field appears when that wallet, or another wallet you can use, has money set aside for an active goal.
  1. Start a new expense, or edit one.
  2. Choose the wallet Marker 1 the expense is recorded in. The Goal field Marker 2 appears when that wallet, or another wallet you can use, has money set aside for an active goal.
  3. Choose the goal under Goal. A goal set aside on another wallet is listed with that wallet’s name after “set aside on”. When the goal is set aside on the expense’s own wallet, you see under the field how much is left in plan for it. Choose No goal to leave the expense unlinked.
  4. If the goal is broken down into items, choose one under Breakdown item, or leave it as Not assigned to an item.
  5. Fill in the rest of the expense and save it.

Mobile
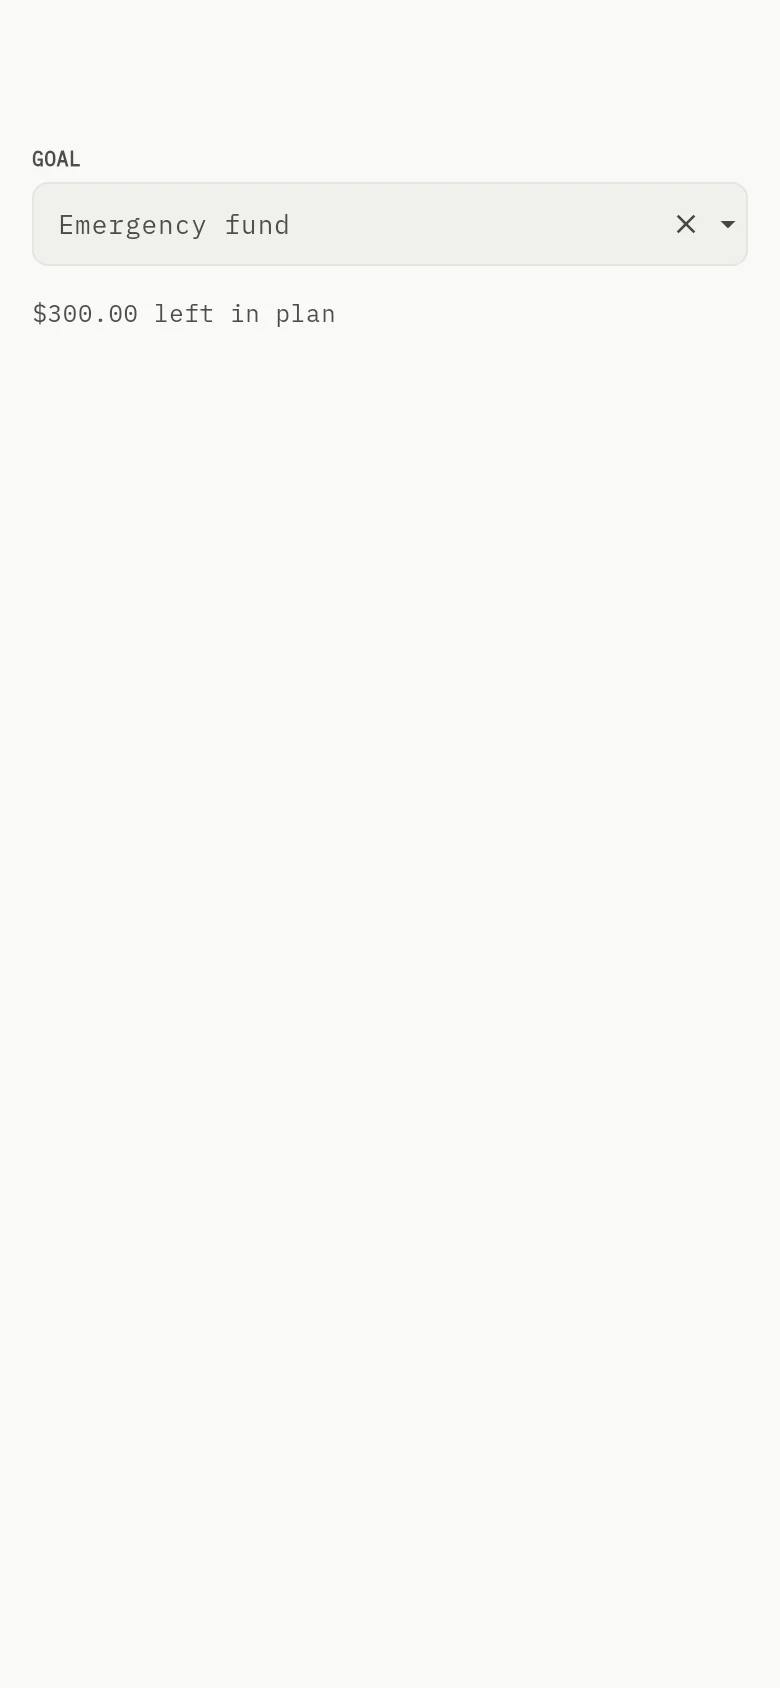
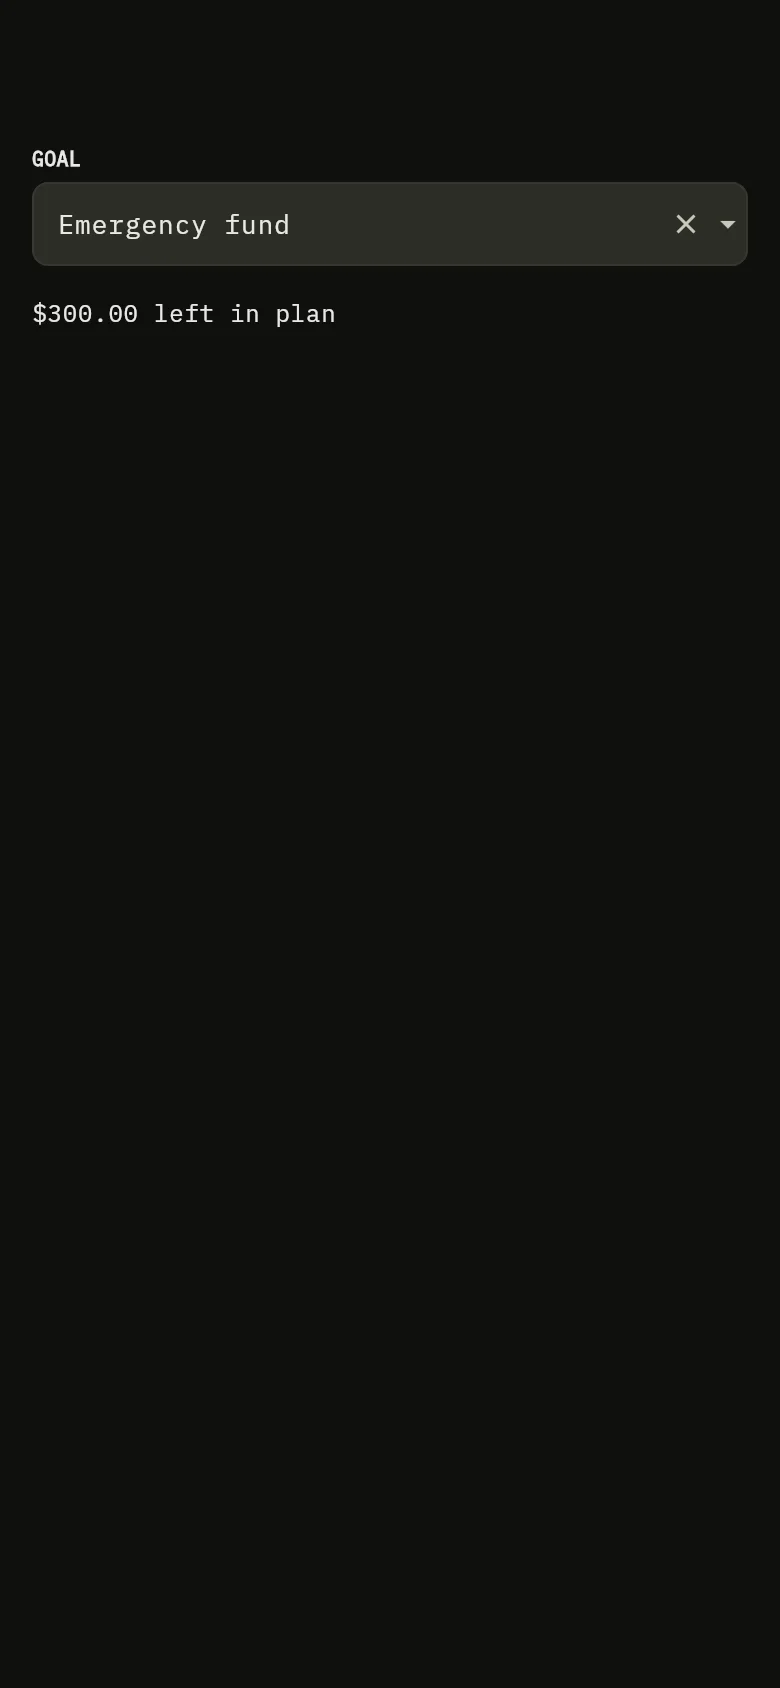
The Goal field of the expense form of the mobile app, with the chosen goal and the amount left in plan under it. 2: Choose the wallet the expense is recorded in. The Goal field appears when that wallet, or another wallet you can use, has money set aside for an active goal.The Goal field of the expense form of the mobile app, with the chosen goal and the amount left in plan under it. 2: Choose the wallet the expense is recorded in. The Goal field appears when that wallet, or another wallet you can use, has money set aside for an active goal.
  1. Start a new expense, or open one and edit it.
  2. Choose the wallet the expense is recorded in. The Goal field Marker 2 appears when that wallet, or another wallet you can use, has money set aside for an active goal.
  3. Choose the goal under Goal. A goal set aside on another wallet is listed with that wallet’s name after “set aside on”. When the goal is set aside on the expense’s own wallet, you see under the field how much is left in plan for it. Choose No goal to leave the expense unlinked.
  4. If the goal is broken down into items, choose one under Breakdown item, or leave it as Not assigned to an item.
  5. Fill in the rest of the expense and save it.

The goals designated on the chosen wallet are offered, and so are the goals with money set aside on another wallet you can use and not yet spent. If you change the expense to an income or a transfer, the link is removed. If you move the expense to another wallet, where to pay from is worked out again for the new wallet.

Pay from money set aside on another wallet

If the expense’s own wallet still has money set aside for the goal, that money is used first and you are not asked where to pay from. When none is left, or none was set aside, you choose which wallet pays.

Web
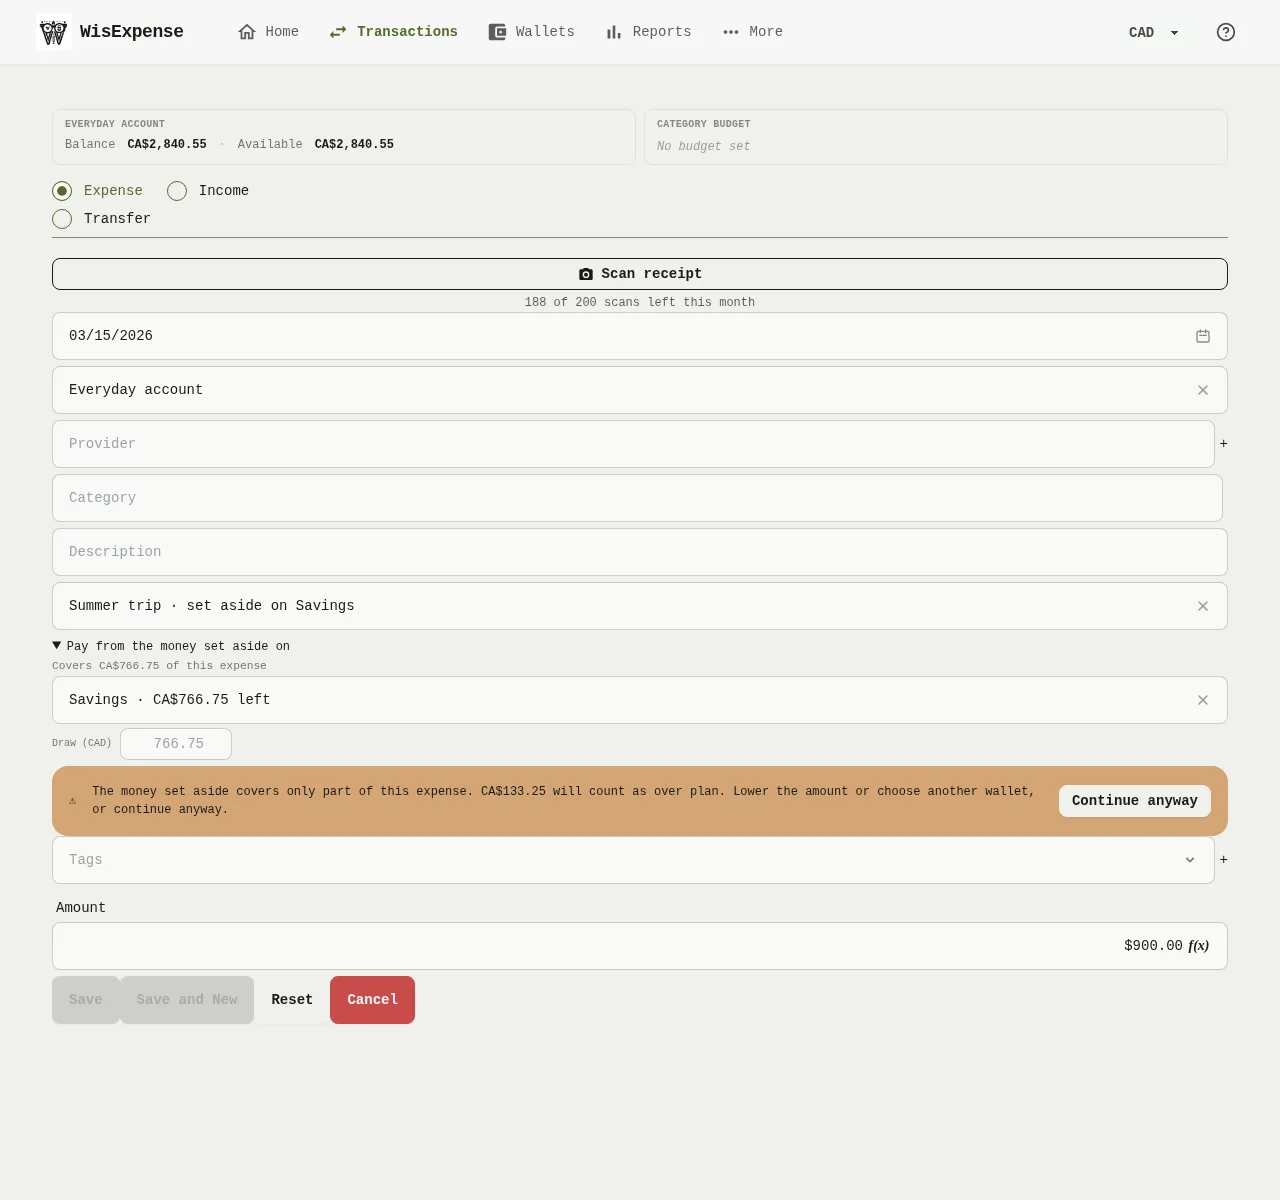
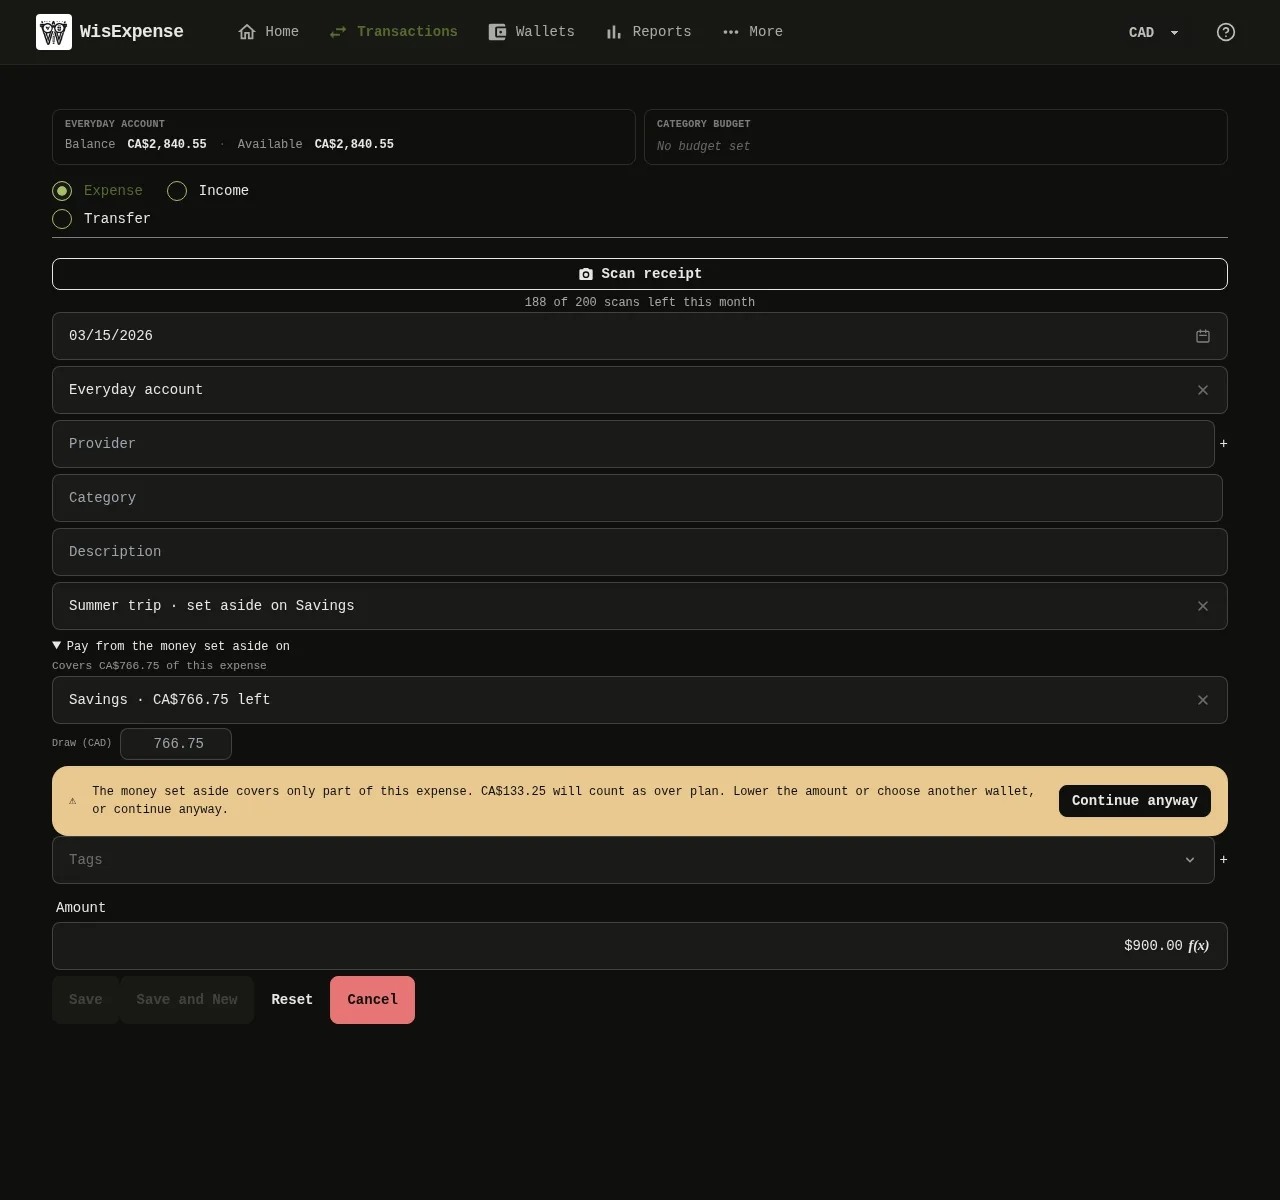
The new transaction form of the web app with the Everyday account wallet chosen, the Summer trip goal set aside on Savings, the field to pay from the money set aside on Savings with the amount left, the draw field, the line saying how much it covers and the warning that part of the expense will count as over plan, with the Continue anyway button. 1: Choose the wallet the expense is recorded in. The Goal field appears when that wallet, or another wallet you can use, has money set aside for an active goal; 2: Choose the wallet the expense is recorded in. The Goal field appears when that wallet, or another wallet you can use, has money set aside for an active goal; 3: The line under Pay from the money set aside on sums up which wallet pays and how much of the expense it covers. Select it to open the details, where the wallets that still have money set aside for the goal are listed with what is left. The one with the most left is chosen for you. Choose another if you prefer; 4: Look at the draw field, labelled Draw with the wallet’s currency. Leave it empty to take what the expense needs, or type a smaller amount to take less; 5: Read the line that starts with “Covers”: how much of the expense the money set aside covers. When the two wallets use different currencies, it also shows how much is taken from the other wallet, both converted at the exchange rate; 6: If the money set aside covers only part of the expense, a warning says how much will count as over plan. Lower the amount, choose another wallet, or select Continue anyway, then save the expense.The new transaction form of the web app with the Everyday account wallet chosen, the Summer trip goal set aside on Savings, the field to pay from the money set aside on Savings with the amount left, the draw field, the line saying how much it covers and the warning that part of the expense will count as over plan, with the Continue anyway button. 1: Choose the wallet the expense is recorded in. The Goal field appears when that wallet, or another wallet you can use, has money set aside for an active goal; 2: Choose the wallet the expense is recorded in. The Goal field appears when that wallet, or another wallet you can use, has money set aside for an active goal; 3: The line under Pay from the money set aside on sums up which wallet pays and how much of the expense it covers. Select it to open the details, where the wallets that still have money set aside for the goal are listed with what is left. The one with the most left is chosen for you. Choose another if you prefer; 4: Look at the draw field, labelled Draw with the wallet’s currency. Leave it empty to take what the expense needs, or type a smaller amount to take less; 5: Read the line that starts with “Covers”: how much of the expense the money set aside covers. When the two wallets use different currencies, it also shows how much is taken from the other wallet, both converted at the exchange rate; 6: If the money set aside covers only part of the expense, a warning says how much will count as over plan. Lower the amount, choose another wallet, or select Continue anyway, then save the expense.
  1. Choose the goal Marker 2 that is set aside on another wallet.
  2. The line under Pay from the money set aside on sums up which wallet pays and how much of the expense it covers. Select it to open the details, where the wallets Marker 3 that still have money set aside for the goal are listed with what is left. The one with the most left is chosen for you. Choose another if you prefer.
  3. Look at the draw field Marker 4, labelled Draw with the wallet’s currency. Leave it empty to take what the expense needs, or type a smaller amount to take less.
  4. Read the line Marker 5 that starts with “Covers”: how much of the expense the money set aside covers. When the two wallets use different currencies, it also shows how much is taken from the other wallet, both converted at the exchange rate.
  5. If the money set aside covers only part of the expense, a warning Marker 6 says how much will count as over plan. Lower the amount, choose another wallet, or select Continue anyway, then save the expense.

Mobile
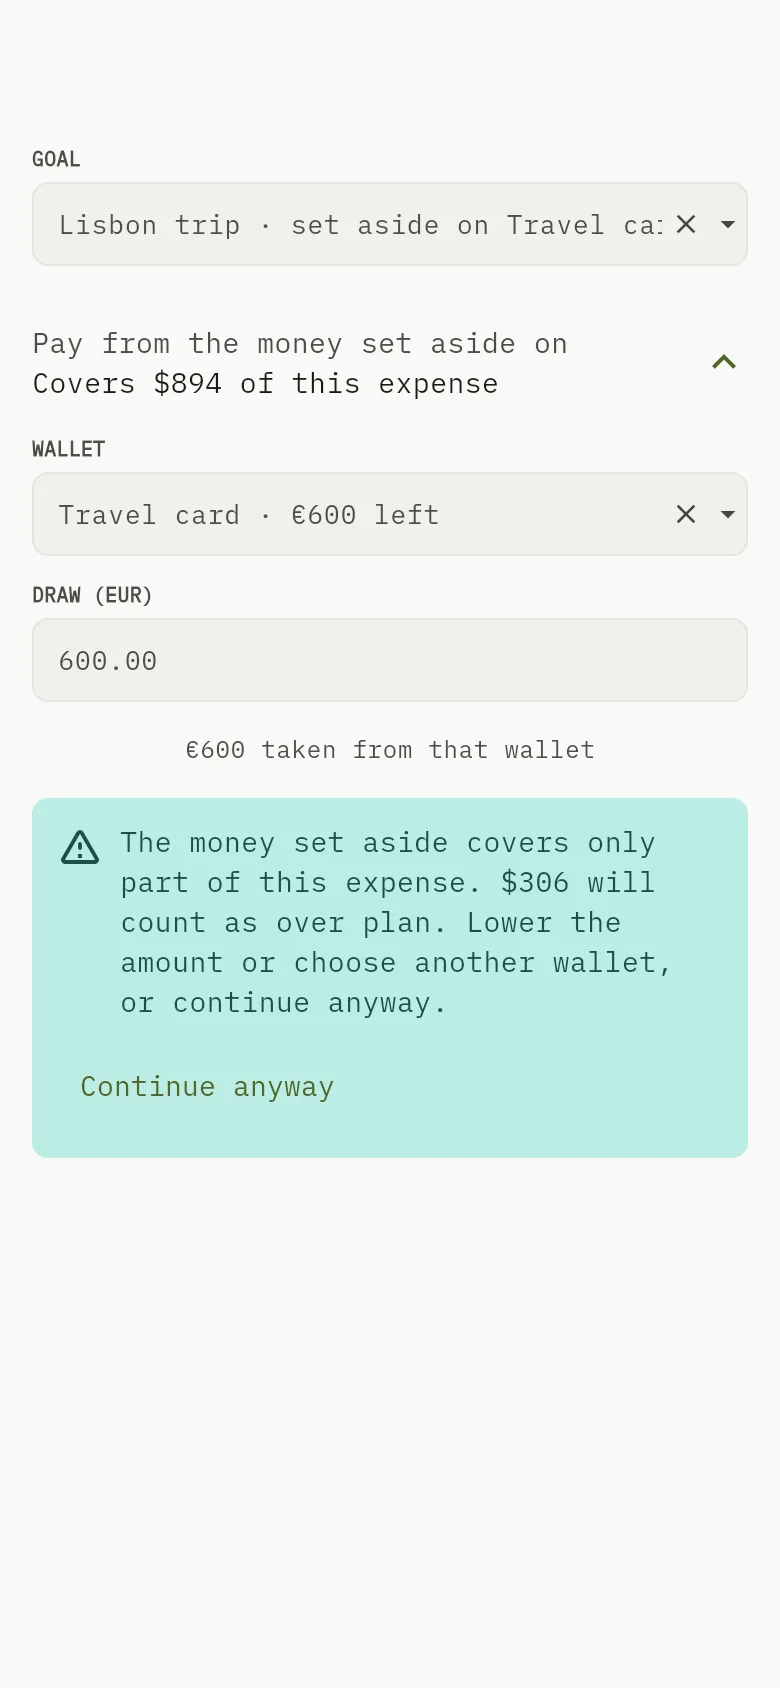
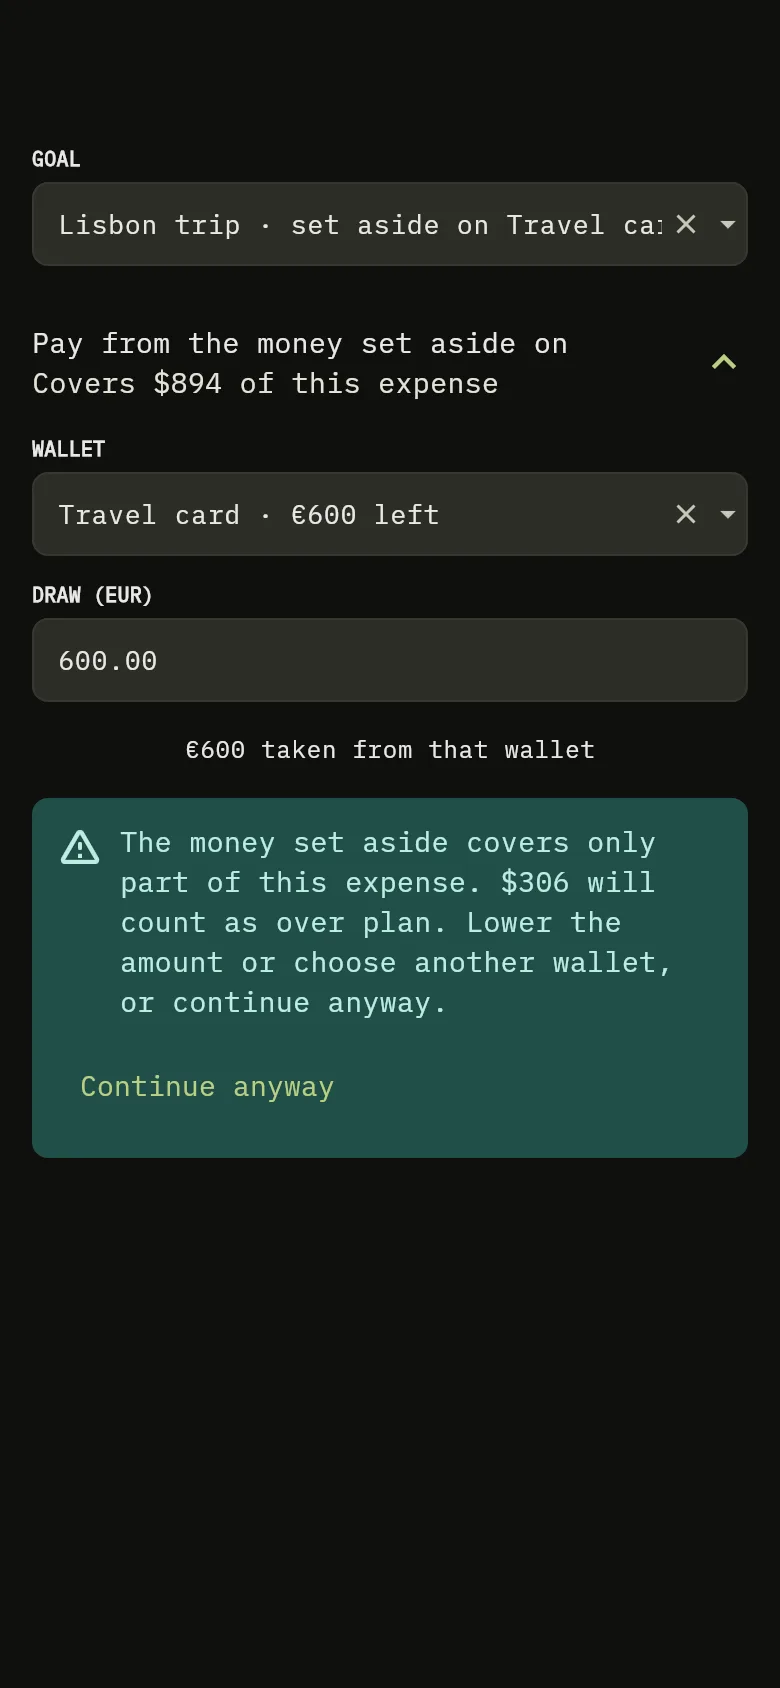
The goal part of the expense form of the mobile app, with a goal set aside on another wallet, the field to pay from that wallet with the amount left, the draw field, the line saying how much it covers and the warning that part of the expense will count as over plan, with the Continue anyway button. 2: Choose the wallet the expense is recorded in. The Goal field appears when that wallet, or another wallet you can use, has money set aside for an active goal; 3: The line under Pay from the money set aside on sums up which wallet pays and how much of the expense it covers. Select it to open the details, where the wallets that still have money set aside for the goal are listed with what is left. The one with the most left is chosen for you. Choose another if you prefer; 4: Look at the draw field, labelled Draw with the wallet’s currency. Leave it empty to take what the expense needs, or type a smaller amount to take less; 5: Read the line that starts with “Covers”: how much of the expense the money set aside covers. When the two wallets use different currencies, it also shows how much is taken from the other wallet, both converted at the exchange rate; 6: If the money set aside covers only part of the expense, a warning says how much will count as over plan. Lower the amount, choose another wallet, or tap Continue anyway, then save the expense.The goal part of the expense form of the mobile app, with a goal set aside on another wallet, the field to pay from that wallet with the amount left, the draw field, the line saying how much it covers and the warning that part of the expense will count as over plan, with the Continue anyway button. 2: Choose the wallet the expense is recorded in. The Goal field appears when that wallet, or another wallet you can use, has money set aside for an active goal; 3: The line under Pay from the money set aside on sums up which wallet pays and how much of the expense it covers. Select it to open the details, where the wallets that still have money set aside for the goal are listed with what is left. The one with the most left is chosen for you. Choose another if you prefer; 4: Look at the draw field, labelled Draw with the wallet’s currency. Leave it empty to take what the expense needs, or type a smaller amount to take less; 5: Read the line that starts with “Covers”: how much of the expense the money set aside covers. When the two wallets use different currencies, it also shows how much is taken from the other wallet, both converted at the exchange rate; 6: If the money set aside covers only part of the expense, a warning says how much will count as over plan. Lower the amount, choose another wallet, or tap Continue anyway, then save the expense.
  1. Choose the goal Marker 2 that is set aside on another wallet.
  2. The line under Pay from the money set aside on sums up which wallet pays and how much of the expense it covers. Select it to open the details, where the wallets Marker 3 that still have money set aside for the goal are listed with what is left. The one with the most left is chosen for you. Choose another if you prefer.
  3. Look at the draw field Marker 4, labelled Draw with the wallet’s currency. Leave it empty to take what the expense needs, or type a smaller amount to take less.
  4. Read the line Marker 5 that starts with “Covers”: how much of the expense the money set aside covers. When the two wallets use different currencies, it also shows how much is taken from the other wallet, both converted at the exchange rate.
  5. If the money set aside covers only part of the expense, a warning Marker 6 says how much will count as over plan. Lower the amount, choose another wallet, or tap Continue anyway, then save the expense.

When you save, the money the expense uses moves with it: that part of the other wallet’s designation moves to the wallet the expense is recorded in and is spent there. The goal’s plan does not change. Wallet by wallet, the plan on the paying wallet goes down and the plan on the expense’s wallet goes up by the same amount, so Spent and Left in plan read exactly as if the expense had been paid from the other wallet. The goal’s details show the expense with the wallet that paid for it: see Track your progress.

If the money set aside does not cover the whole expense, it moves as far as it goes, the expense is saved and linked, and the rest counts as over plan, as described below.

If you delete the expense, unlink it, or lower its amount, exactly what was drawn goes back to the wallet it came from. If that wallet, or its designation for the goal, no longer exists, the money goes to the expense’s wallet instead.

On a shared goal you can pay only from wallets that are shared with you. If the money set aside falls short, you can continue anyway or lower the amount, but you cannot change other designations.

What happens to the plan

Linking an expense does not change the plan. What you planned for the goal on the wallet stays the same, Spent goes up by the expense and Left in plan goes down. The wallet’s balance goes down by the expense, exactly as for an expense without a goal. When the goal is in another currency than the expense, the expense is converted into the goal’s currency.

You can spend more than you planned. The expense is saved, Left in plan turns negative and the goal shows Over plan.

If you delete the expense, unlink it, move it to another goal or lower its amount, the goal’s Spent is worked out again from the expenses still linked to it. A goal accepts linked expenses until you close it, whatever its target date.

Break a goal down into items

A breakdown splits a goal into named items, such as flights or hospital fees, each with its own planned amount. It needs the Standard plan or above.

Tip

Breaking a goal down is available on the Standard plan and above. On the Free plan, the goal’s details still list its linked transactions, and the breakdown section says so and offers See plans.

Web
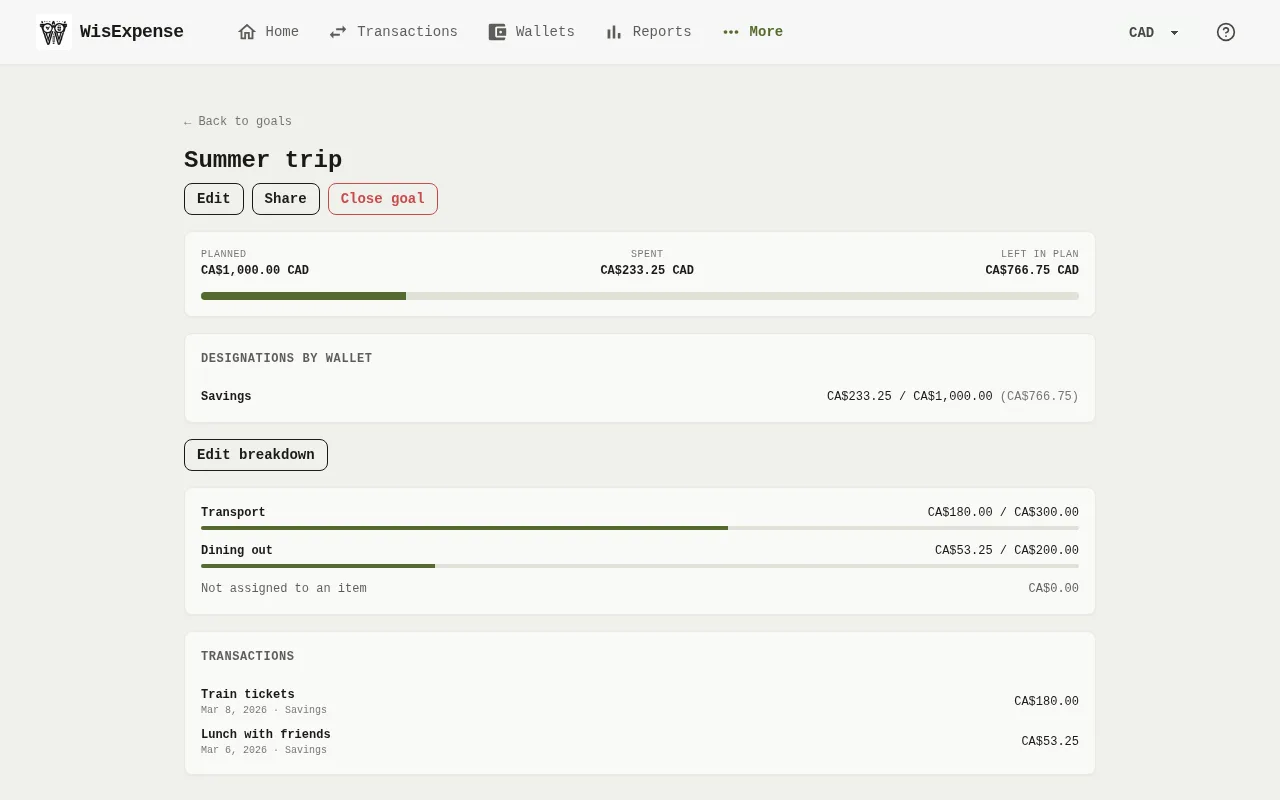
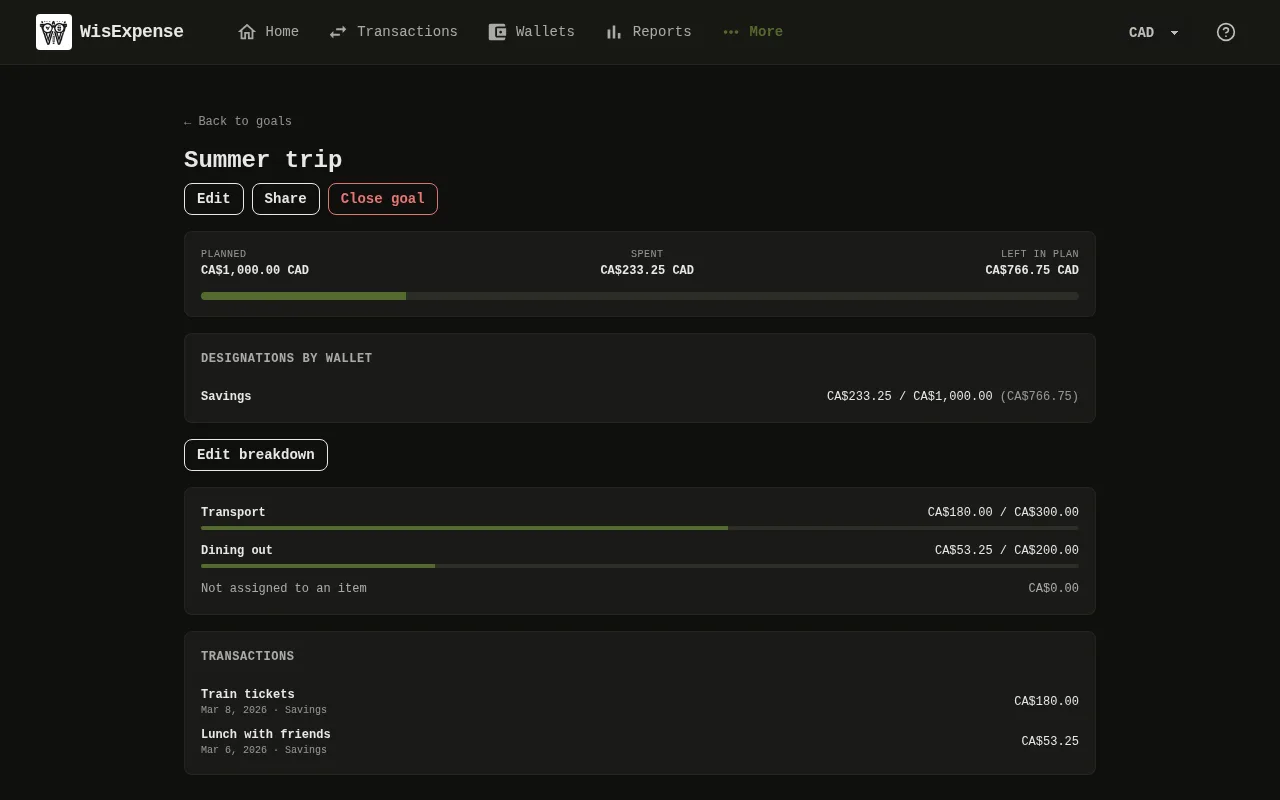
The details of a goal on the web app, with the Edit breakdown button above the list of items and the list of linked transactions. 7: Select Break this goal down, or Edit breakdown when it already has items; 8: Each item now shows what you spent against what you planned, and expenses without an item are listed as Not assigned to an item.The details of a goal on the web app, with the Edit breakdown button above the list of items and the list of linked transactions. 7: Select Break this goal down, or Edit breakdown when it already has items; 8: Each item now shows what you spent against what you planned, and expenses without an item are listed as Not assigned to an item.
  1. Open the goal’s details: select the three dots on its card, then Details.
  2. Select Break this goal down Marker 7, or Edit breakdown when it already has items.
  3. Select Add item, type a name such as Flights under Item, e.g. Flights and the planned amount, then repeat for each item.
  4. Select Save.
  5. Each item Marker 8 now shows what you spent against what you planned, and expenses without an item are listed as Not assigned to an item.

Mobile
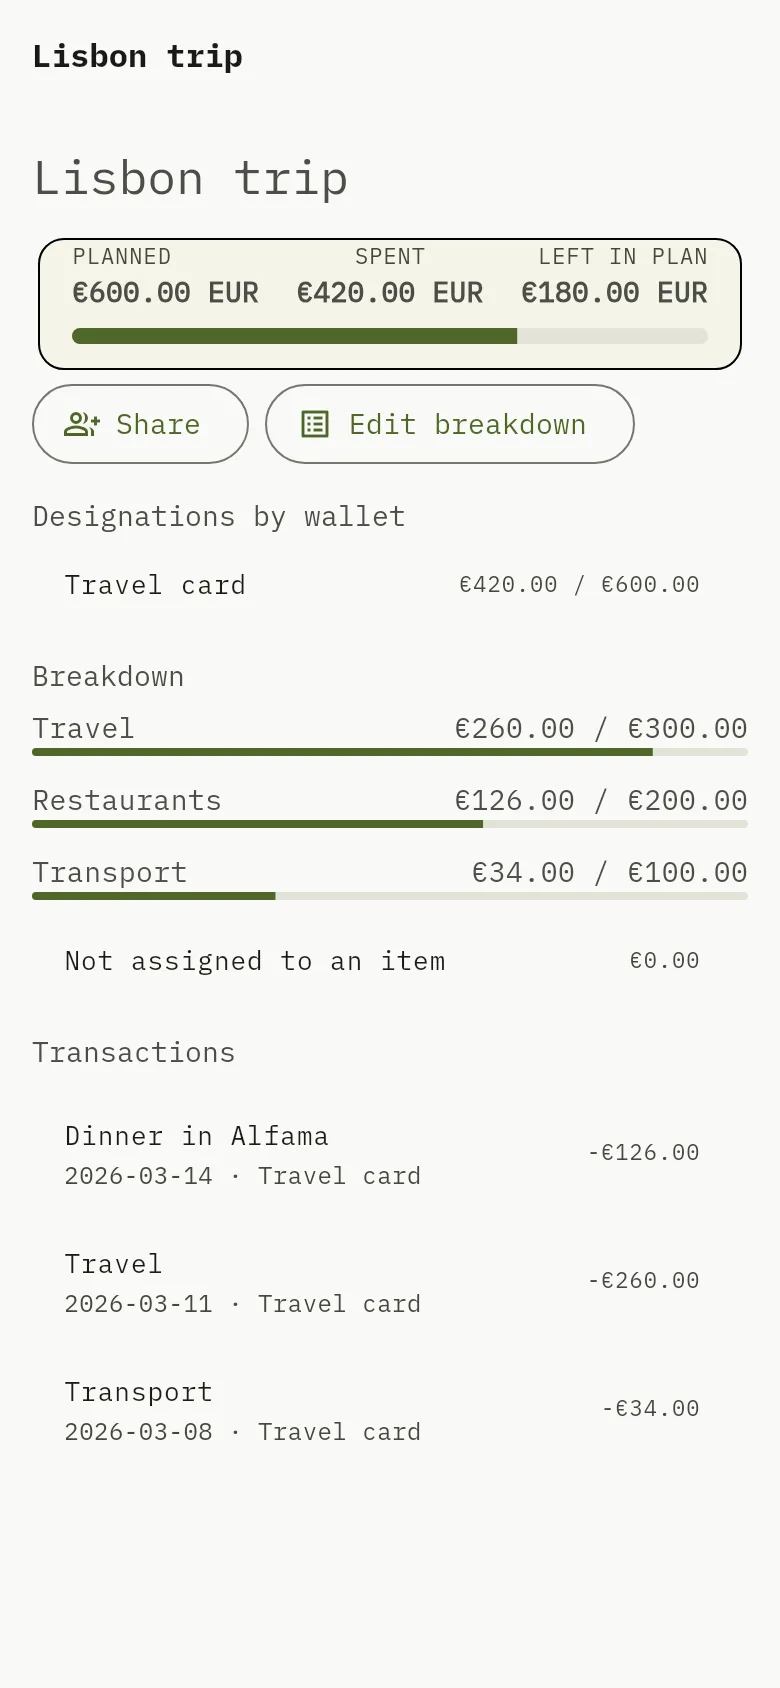
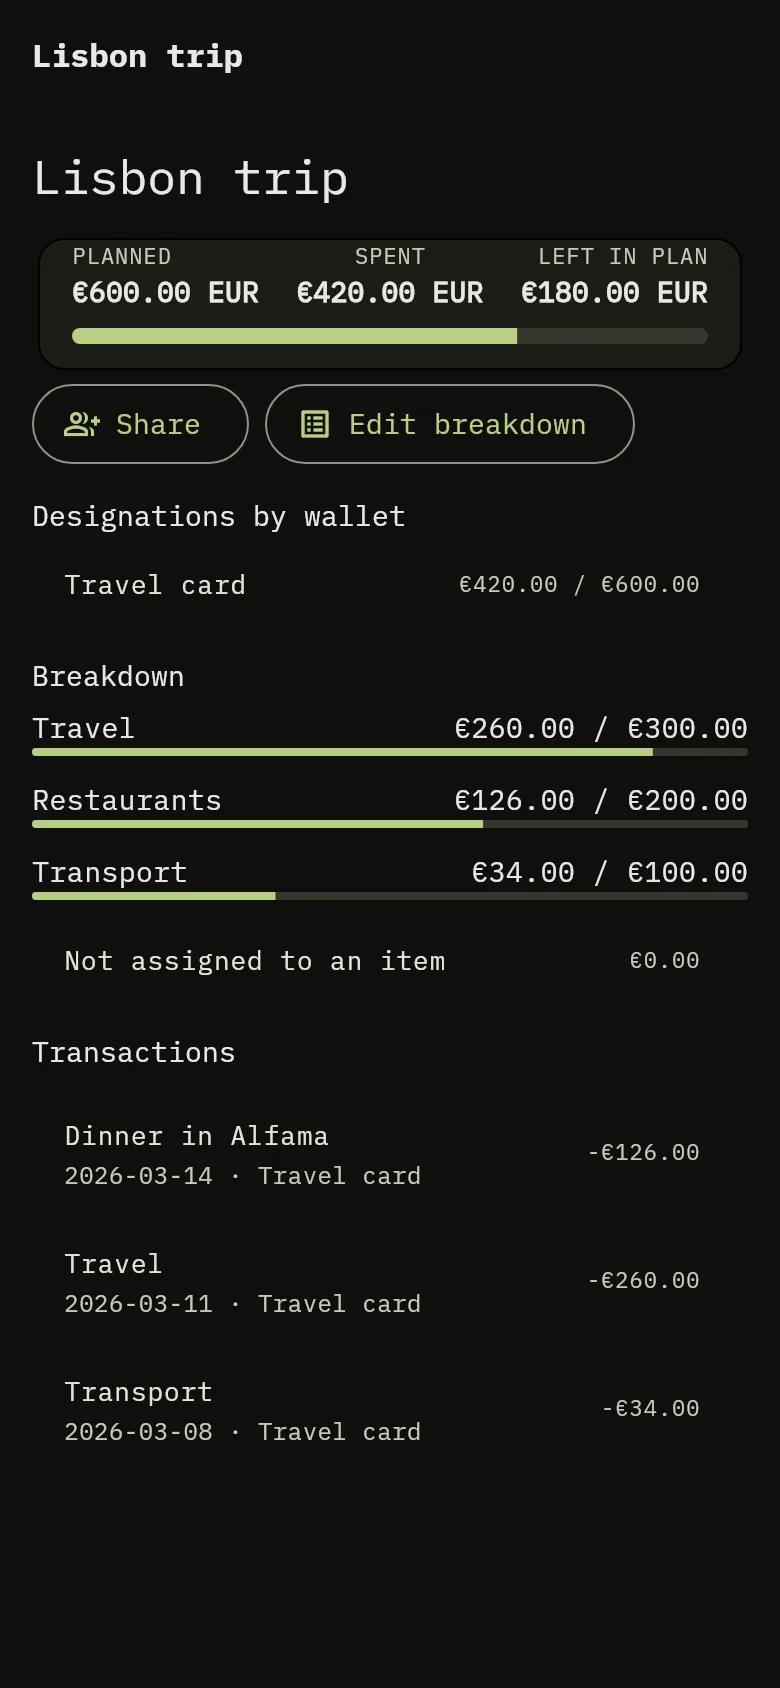
The details of a goal on the mobile app, with the Edit breakdown button above the list of items and the list of linked transactions. 7: Tap Break this goal down, or Edit breakdown when it already has items; 8: Each item now shows what you spent against what you planned, and expenses without an item are listed as Not assigned to an item.The details of a goal on the mobile app, with the Edit breakdown button above the list of items and the list of linked transactions. 7: Tap Break this goal down, or Edit breakdown when it already has items; 8: Each item now shows what you spent against what you planned, and expenses without an item are listed as Not assigned to an item.
  1. Open the goal’s details: tap the three dots on its card, then Details.
  2. Tap Break this goal down Marker 7, or Edit breakdown when it already has items.
  3. Tap Add item, type a name such as Flights under Item, e.g. Flights and the planned amount, then repeat for each item.
  4. Tap Save breakdown.
  5. Each item Marker 8 now shows what you spent against what you planned, and expenses without an item are listed as Not assigned to an item.

A goal with no items works as before. If your plan later falls below Standard, an existing breakdown stays visible with its links, but you can no longer change it.

What you see

The expense appears in the goal’s details under Transactions, with the wallet that paid for it when it was paid from another wallet’s designation, and the goal’s Spent and Left in plan are updated.

Track your progress, Close a goal and Set money aside with designations.